
Room Progression and Verified Cash Barriers
Advancing through the mine follows a clear loop. Players enter an unlocked room, strike rock nodes with their pickaxe, and transport three raw rocks (0/3 to 3/3 backpack capacity) to the cutting station. Machine timers show readings like 12s, 21s, and 24s. When processing finishes, the screen alerts Cutting complete! Collect your stone from the machine, and the prompt reads Ready! (E). Taking finished goods to [E] Sell Rocks converts inventory into cash.
Once you build sufficient savings, you approach the locked transit passage gating the next area:
| Barrier Location | On-Screen Barrier Label | Verified Unlock Cost | Progression Note |
|---|---|---|---|
| Room 1 to Room 2 Transit | Locked - 100$ | $100 in-game cash | Cleared after introductory node mining and early stone sales. |
| Room 2 to Room 3 Transit | Locked - 1K$ | $1,000 in-game cash | Gated behind Room 2 nodes and higher capacity requirements. |
These barriers represent physical transit passages between chambers rather than simple room doors. Players afford both early unlocks quickly through basic rock sales. Follow the cash progression guide to optimize cutting station turnarounds and reach the $1,000 threshold without delays.
Instant Floor Break Pricing: All 30 Tiers
For players who prefer paying Robux instead of mining nodes manually, the developer products catalog lists 30 separate Instant Floor Break purchases. Each SKU increases in price by 10 Robux, beginning at 10 Robux and capping at 300 Robux.
Duality Works names each product after its Robux price rather than a floor number (Instant Floor Break - 10 Robux, Instant Floor Break - 20 Robux, up through 300 Robux). Because no floor numbers appear in product metadata, do not assume that tier 5 unlocks floor 5 or that tier 30 corresponds to floor 30. The game presents these price points dynamically as you encounter higher barriers.
| Product Name | Price (Robux) |
|---|---|
| Instant Floor Break - 10 Robux | 10 |
| Instant Floor Break - 20 Robux | 20 |
| Instant Floor Break - 30 Robux | 30 |
| Instant Floor Break - 40 Robux | 40 |
| Instant Floor Break - 50 Robux | 50 |
| Instant Floor Break - 60 Robux | 60 |
| Instant Floor Break - 70 Robux | 70 |
| Instant Floor Break - 80 Robux | 80 |
| Instant Floor Break - 90 Robux | 90 |
| Instant Floor Break - 100 Robux | 100 |
| Instant Floor Break - 110 Robux | 110 |
| Instant Floor Break - 120 Robux | 120 |
| Instant Floor Break - 130 Robux | 130 |
| Instant Floor Break - 140 Robux | 140 |
| Instant Floor Break - 150 Robux | 150 |
| Instant Floor Break - 160 Robux | 160 |
| Instant Floor Break - 170 Robux | 170 |
| Instant Floor Break - 180 Robux | 180 |
| Instant Floor Break - 190 Robux | 190 |
| Instant Floor Break - 200 Robux | 200 |
| Instant Floor Break - 210 Robux | 210 |
| Instant Floor Break - 220 Robux | 220 |
| Instant Floor Break - 230 Robux | 230 |
| Instant Floor Break - 240 Robux | 240 |
| Instant Floor Break - 250 Robux | 250 |
| Instant Floor Break - 260 Robux | 260 |
| Instant Floor Break - 270 Robux | 270 |
| Instant Floor Break - 280 Robux | 280 |
| Instant Floor Break - 290 Robux | 290 |
| Instant Floor Break - 300 Robux | 300 |
Room Drop Rates and Ceiling Boards
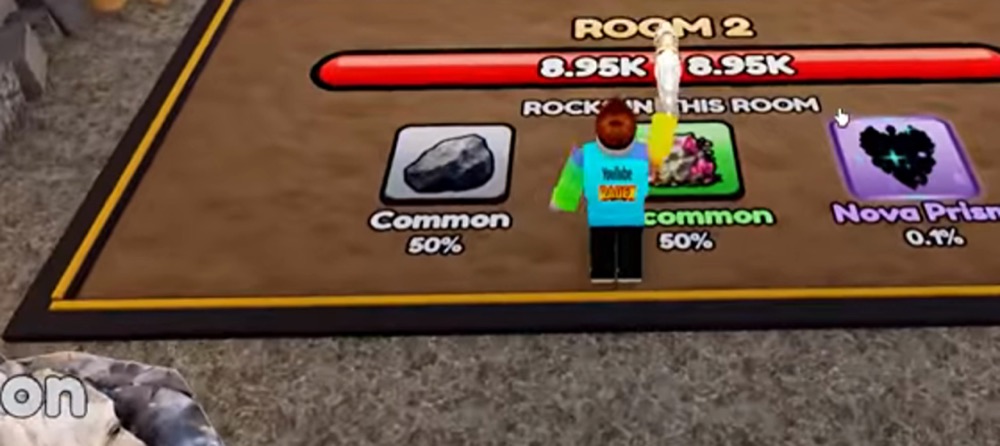
Each mining room features an overhead sign labeled ROCKS IN THIS ROOM displaying the room identifier, node capacity numbers, and drop percentages for available stone types. In guide video footage, two room boards can be read clearly:
This is the Room 2 board as it appears on the floor. The bar is the remaining rock count for the room, and the three tiles under it are the only pulls that room can give. Frame from the guide video at 1:48.
| Room Identifier | Overhead Capacity Metric | Stone Rarity | Drop Percentage |
|---|---|---|---|
| Room 2 | 8.95K / 8.95K | Common | 50% |
| Room 2 | 8.95K / 8.95K | Uncommon | 50% |
| Room 2 | 8.95K / 8.95K | Nova Prism | 0.1% |
| Room 3 | 80.1K / 80.1K | Common | 35% |
| Room 3 | 80.1K / 80.1K | Uncommon | 50% |
| Room 3 | 80.1K / 80.1K | Rare | 15% |
| Room 3 | 80.1K / 80.1K | Nova Prism | 0.1% |
Room 1 also contains an overhead board, but in available video frames the text and percentage figures are blurred and illegible. In accordance with strict source verification, we record Room 1 figures as unreadable rather than fabricating numbers.
The shift between Room 2 and Room 3 demonstrates how the game introduces higher rarity tiers. Uncommon drops stay steady at 50%, while Common drops fall from 50% down to 35% to accommodate a 15% Rare tier. Both rooms retain an identical 0.1% chance for Nova Prism. For an in-depth breakdown of rolling probability on rare drops, visit the room drop percentages and rock rarities.
Evaluating Instant Floor Break Purchases
Our read on Instant Floor Break purchases is that they represent weak spending value. Floor barriers clear permanently once purchased with standard in-game cash ($100 for the first transit zone and $1,000 for the second), meaning spending 10 to 300 Robux merely skips a brief farming cycle.
Training Power on anvils improves output across every room you enter. Instant Floor Breaks provide only a single-use bypass on one barrier. Keeping your Robux for account-wide multipliers while clearing barriers through manual mining remains the most practical progression path.